Are you interested in learning how to create a webinar? Did you know that 73% of marketing and sales leaders agree that webinars are one of the BEST lead generation methods. Yes, this form of content deserves its place in your marketing strategy.
Since you understand the value of a webinar, all you need to do now is start making one for yourself. Here’s a step-by-step guide on how to make a custom and professional webinar for your business.
Table of Contents
How to Prepare Webinar Content
Step 1: Choose a topic
Jay Acunzo, Founder of Unthinkable Media, chooses his webinar topics based on what will best serve his audience. Here are some ways to source content ideas:
- Survey your fans on social media and see what questions they’d like answered through a webinar.
- Look for common themes from customer conversations with your brand’s client service or sales departments. If the majority of these inquirers ask the same set of questions, use your webinar to answer them.
- Consider your business objectives. For example, if you want to spotlight a new product, consider doing a demo of it during your webinar.
Wherever you choose to look for inspiration, make sure you consider your audience’s interests first.
Step 2: Outline your agenda
Consider your main and subtopics. Decide whether or not you’ll need additional materials to help your attendees learn.
For a more dynamic webinar, consider using one or more of these visual tools: whiteboards, screen sharing, and presentation mode.
Experts in eLearning have confirmed the power of visuals in webinars. We now know that using visuals during your presentation will help attendees:
- Retain information long term.
- Process information 60,000 times faster than they would only hear the same material spoken out loud.
- Improve learning comprehension by up to 400%.
Setting Up Your Webinar
Step 3: Schedule the webinar
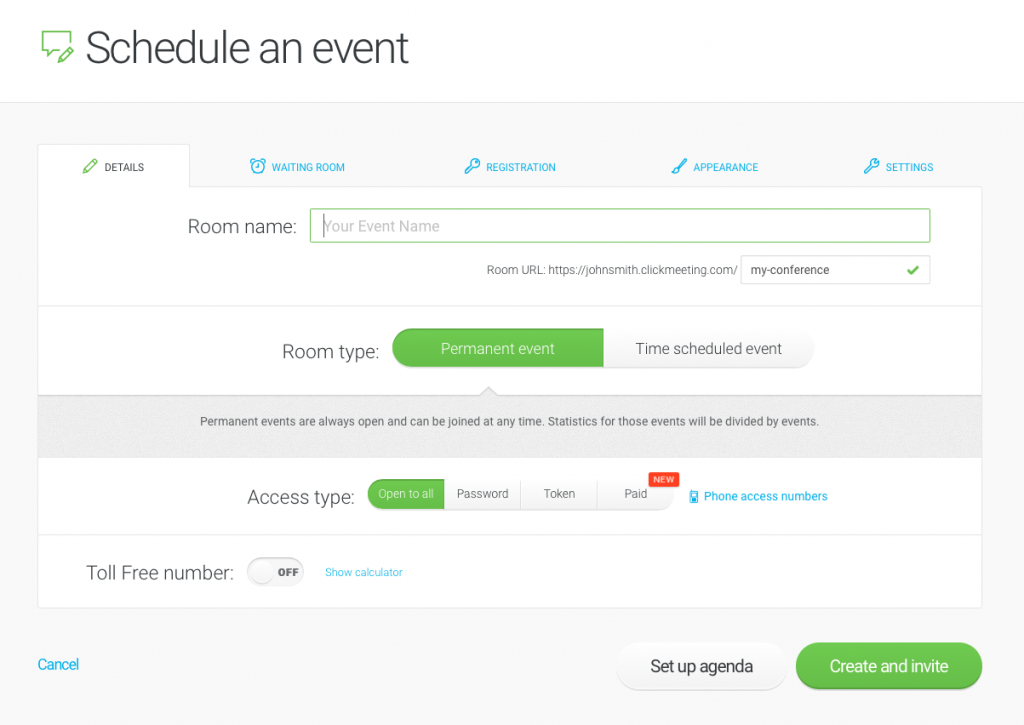
Scheduling your webinar usually includes setting up the basics first. Include the following:
- Name your webinar room. Use primary keywords to help improve replay SEO. Keep in mind that this webinar room name will be displayed as your URL too.
- Choose the date, time, and time zone for your webinar.
- Decide how participants will access the webinar. If you’re conducting a paid webinar experience, choose between the password or token options. If the webinar is for everyone, mark the open to all tab.
- Determine if you’ll allow people to join via a traditional telephone call. Set up a toll free number they can call if a computer or internet connection isn’t their best option. Most quality webinar solutions like ClickMeeting will give you the opportunity to set this part up when you first create your event.
If your goal is monetize your expertise with paid webinars, make sure your webinar account is integrated with PayPal.
Step 4: Customize your webinar design
From event registration page, through the attendee waiting room, up to the webinar room itself – designing your webinar pages will have an impact on your guests’ first impression. Customize all the pages with your brand colors and logo to match your brand identity and webinar topic.
Make your webinar both visually appealing and functional. All webinars should include the following:
- A well-designed registration page that makes it easy for people to sign up for your webinar.
- Custom branding with your logo, brand color scheme, and stunning background images from Unsplash photo directory, displayed on all your webinar pages.
- Striking call to action buttons to help guide webinar participants towards their next action.
Adding Special Features and Functions to Your Webinar
Step 5: Set up your attendee waiting room
As soon as you designed your webinar pages, it’s time to think about what will happen in the waiting room. It’s a place where your attendees will land right before the webinar starts.
Let your attendees clearly see what they expect from the event and add your event agenda. Attendees can review what they’re going to hear in the webinar ahead of time and prep any questions they might have during this time.
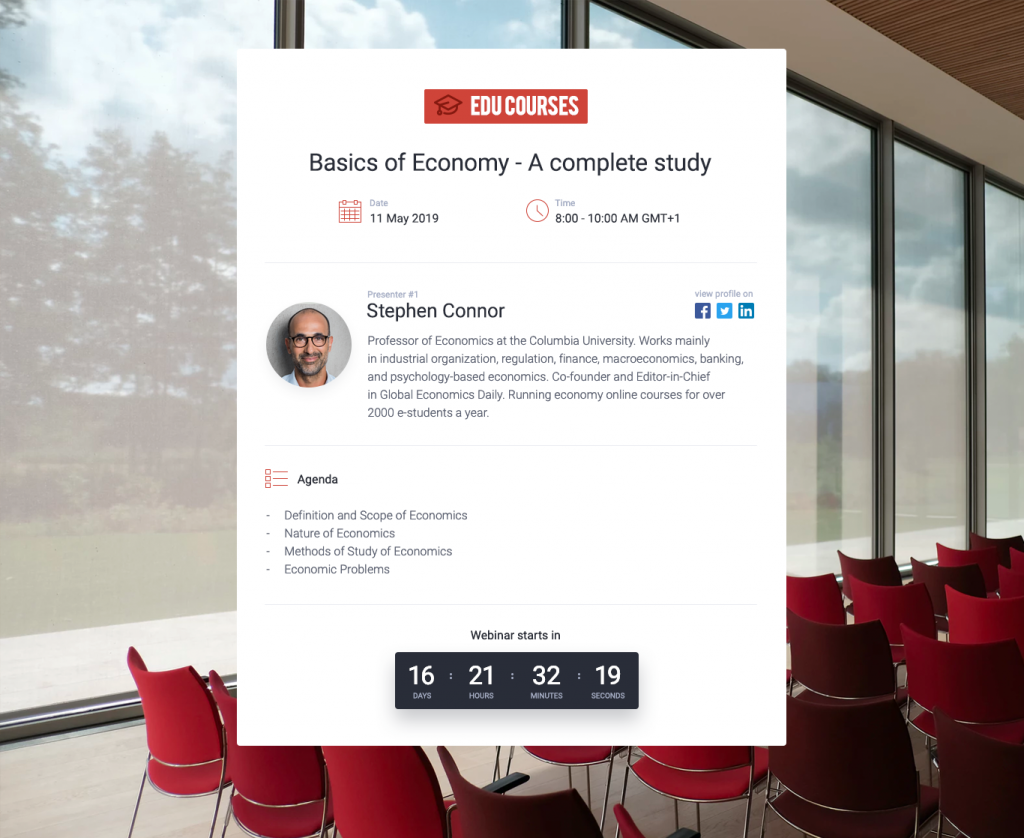
Next, drag and drop event presenter info. Include a photo, bio, and any relevant social media handles so guests can connect with the speaker before the webinar even begins.
After you’ve done all that, add files for attendees to download. This will give everyone a chance to open the content and get things set up before the webinar starts.
Step 6: Set up a thank you page
Once the webinar is over, do you want your attendees to be automatically redirected to a thank-you page? Set this up now using your webinar bonus feature settings. A branded thank you page is a nice personal touch after any presentation.
You can also make this thank-you page a tool for sales. Present next steps, offer additional content or reiterate your call-to-action here.
Step 7: Make your connection status visible
This set of bars featured at the top of your webinar page will help viewers know they are connected to the presentation. They can view any changes to their connection quality during the webinar and make adjustments on the fly.
Step 8: Expand your reach with social media integrations
To achieve your online business goals more efficiently, make the most of your connections on social media. With integrating your webinar account with your Facebook, LinkedIn or Twitter profile, you can share your event and create more buzz around your brand! Let your followers and friends see your upcoming event on their walls.
But that’s not all:
Although many marketers have regarded Facebook Live and YouTube Live as a threat to webinars, they actually turned out as an opportunity. Integrate with these two social media giants using Facebook and YouTube Live feature, and it will enable you to stream your webinars either on Facebook or on YouTube. Your valuable webinar content needs a broader audience, and these are the tools to make it happen.
Step 9: Automatically send thank you emails to attendees
Set up automatic thank you emails to everyone who attended your webinar now to save you lots of time later. Use the same call-to-action in your thank you email that you used for your thank you landing page. Even if guests didn’t follow through after the webinar, they might change their minds when they see this email later on.
Step 10: Set up auto recording
Are you interested in sharing or selling the replay of your webinar event? Enable recording to start for you at the beginning of the presentation.
On platforms like ClickMeeting, if you leave this box checked, you won’t have to update it for every event manually. Instead, ClickMeeting will automatically record your webinar every time you run an event.
Why is this so important?
Because you will use the recording as an On-demand webinar. If your prospects registered to the event, but couldn’t show up, they can watch it later on, anywhere and anytime they want. On top of that – On-demand webinars will help you in growing your lead base. How? By sending the access to the recorded events, in exchange for an e-mail address. This way, you will reach prospects who haven’t registered to your webinar, and – most probably – haven’t even heard of it.
Final Thoughts: How to Create a Webinar
If you follow this step-by-step guide, creating a webinar will be quite easy. There are a lot of small decisions you need to make along the way. Anticipating your audience needs and keeping your event objectives and mind will help you determine which options are right for your webinar. If you’re looking for more great tips on webinars, check out the ClickMeeting blog.