ClickMeeting is on the move! Recently, we’ve introduced a lot of new features and improvements to make your webinar experience even better. Want to learn how they work and how to get the most out of them?
Jan Meissner – Account Manager at ClickMeeting – during the webinar “What’s New at ClickMeeting – A Practical Guide to the Latest Updates,” covered the most important updates and shared expert tips for leveraging them in your webinars and meetings.
Below you’ll find a webinar recording and a brief summary!
Table of Contents
What will you learn during the webinar?
During the webinar “What’s New at ClickMeeting – A Practical Guide to the Latest Updates,” our expert will guide you through essential ClickMeeting features that have been added to the tool recently. 
You will learn, among others:
- Dividing attendees into groups in breakout rooms
- The use of live emoji
- Why and in which cases it is worth downloading the desktop app
- How to use keyboard shortcuts in the webinar room
- What is Edu Mode and how to use it
- How to give and take away presenters’ permission to start and finish an event
- The differences between a meeting and a webinar
- QR code – how to switch between desktop and mobile in no time.
Online meetings for 40 people
Previously, up to 25 attendees could participate simultaneously in online meetings on ClickMeeting. This format allowed all gathered people to turn on their cameras and microphones and collaborate freely, also using the interactive features of the virtual room.
Now, the platform’s capabilities are even bigger. Up to 40 attendees can take part in an online meeting at the same time.
You can run meetings with your teammates or students and discuss the most important topics live with all cameras and microphones on. Remember that this allows your attendees to use 40 cameras and 40 microphones but it applies only to the meetings.
Jan Meissner
ClickMeeting gives you a choice of two basic types of events: webinars and online meetings. While they have a few things in common, they are very different in some respects. Before creating your event, think about what you want to achieve and then make your choice. Don’t worry – no matter what you choose, the whole setup will be very easy.
While creating an event you can choose whether you want to create a webinar or an online meeting. A webinar is like a huge event on the stage with a big audience of up to 1000 seats. On your virtual stage, there can be only eight people. So a webinar is an event where eight people can turn on the microphones and cameras and one thousand people can listen to them, and a meeting is kind of a big table where we can sit all together and discuss our agenda. And this table has grown from 25 to 40.
Jan Meissner
QR code: how to quickly switch from PC to mobile?
Nowadays, we do more and more things with our mobile devices. It’s easy to make payments, handle official business or go shopping. Of course, this also applies to participating in online events. Whether it’s your team meeting, a college class, or a marketing webinar, you can host and participate from anywhere. All you need is your phone or tablet with you.
Sometimes you start attending an event on your computer and want to continue it on your mobile device. What to do in that case?
Imagine a situation where you are sitting comfortably in front of your computer, attending a lecture or meeting. It turns out that you need to leave the house, but at the same time you don’t want to lose touch with what is happening during the event. How do you quickly switch to a mobile device? You can use a QR code. Just pull out your phone, scan the code located in the event room, and it will take you directly to the event, this time on your mobile device.
Jan Meissner
Where to find the QR code? You need to go to the Event Board and select Generate QR Code.
This will generate a unique QR code leading to your event:
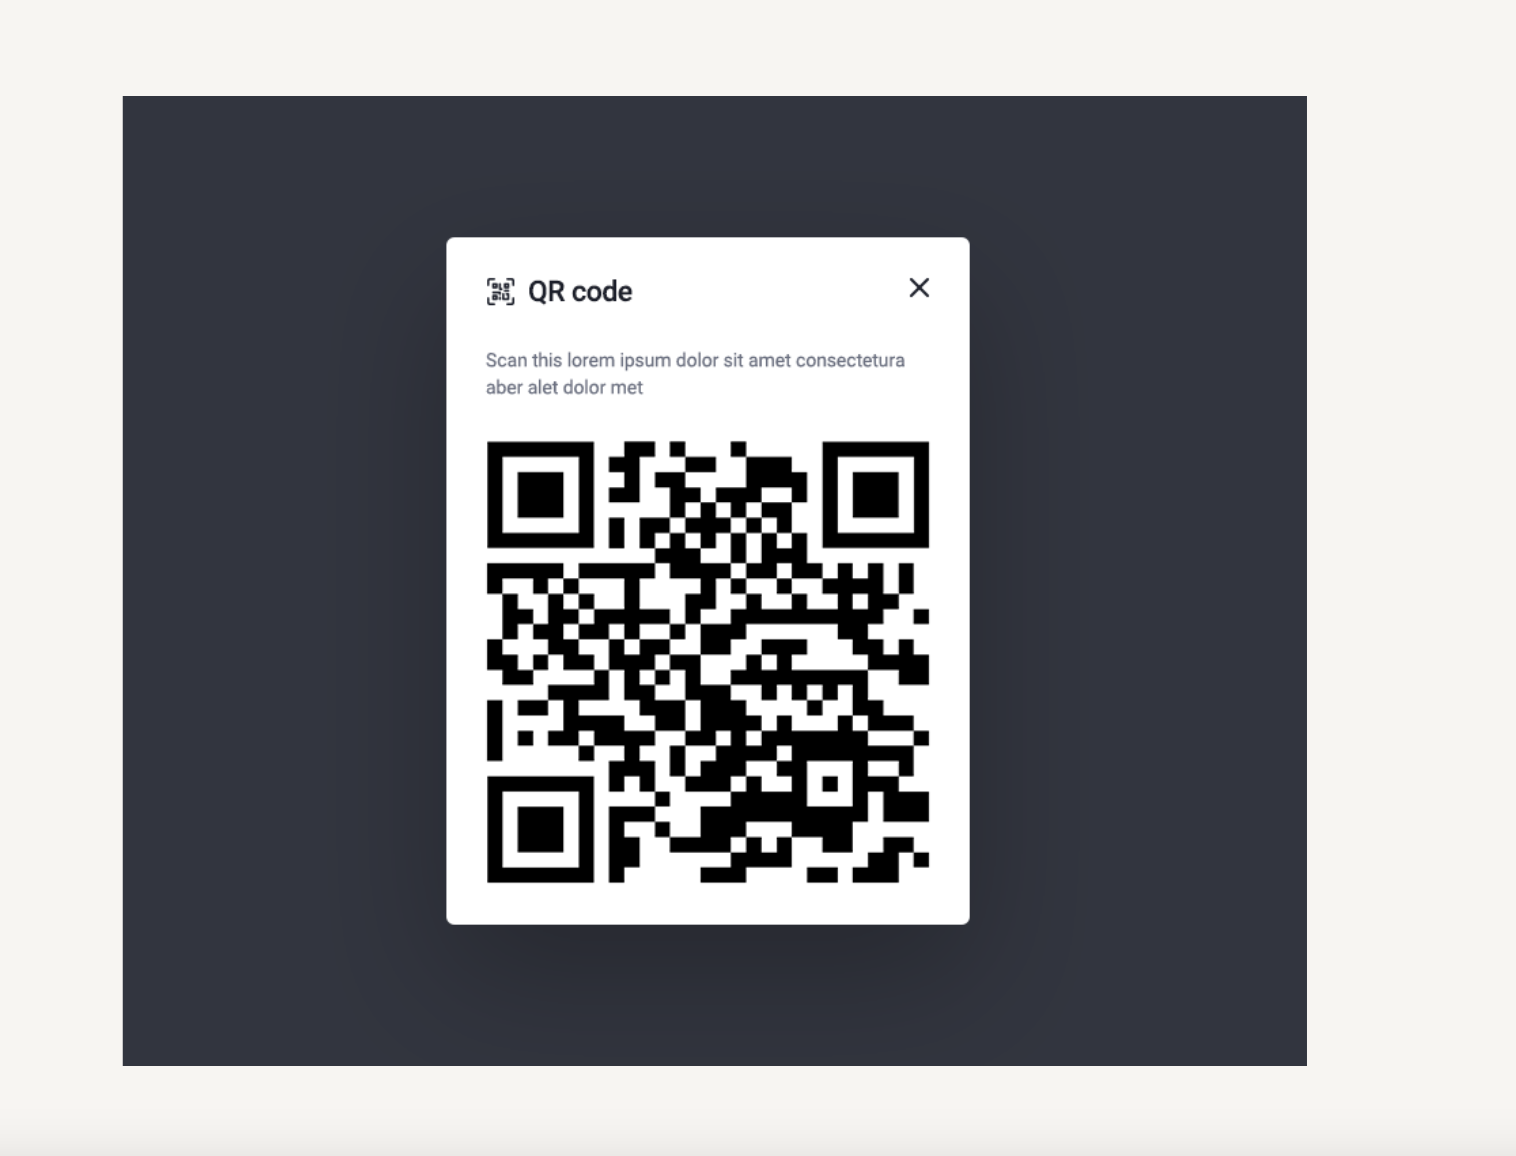
Once scanned on your mobile device, you’ll be able to decide whether you want to join the event via the mobile app (if you don’t already have one, just download it from the Google, iOS or Apps Gallery Huawei store) or the browser on your phone.
Keyboard shortcuts for convenient room navigation
In the Event Board tab, you can find another new feature that will make using ClickMeeting much simpler – keyboard shortcuts.
With these, managing the many activities that take place during online events will be faster. In what scenario will it come in handy? Let’s check out one of them:
I think the most useful combination is the command + shift + m that is muting you or unmuting you. It happens a lot during the meeting when you have to just say a few words once in a while so you don’t have to search for your mouse and the right button.
Jan Meissner
Of course, users who use ClickMeeting extensively will appreciate many combinations. You can find a complete list in the Event Board or by pressing the keyboard shortcut CMD + /
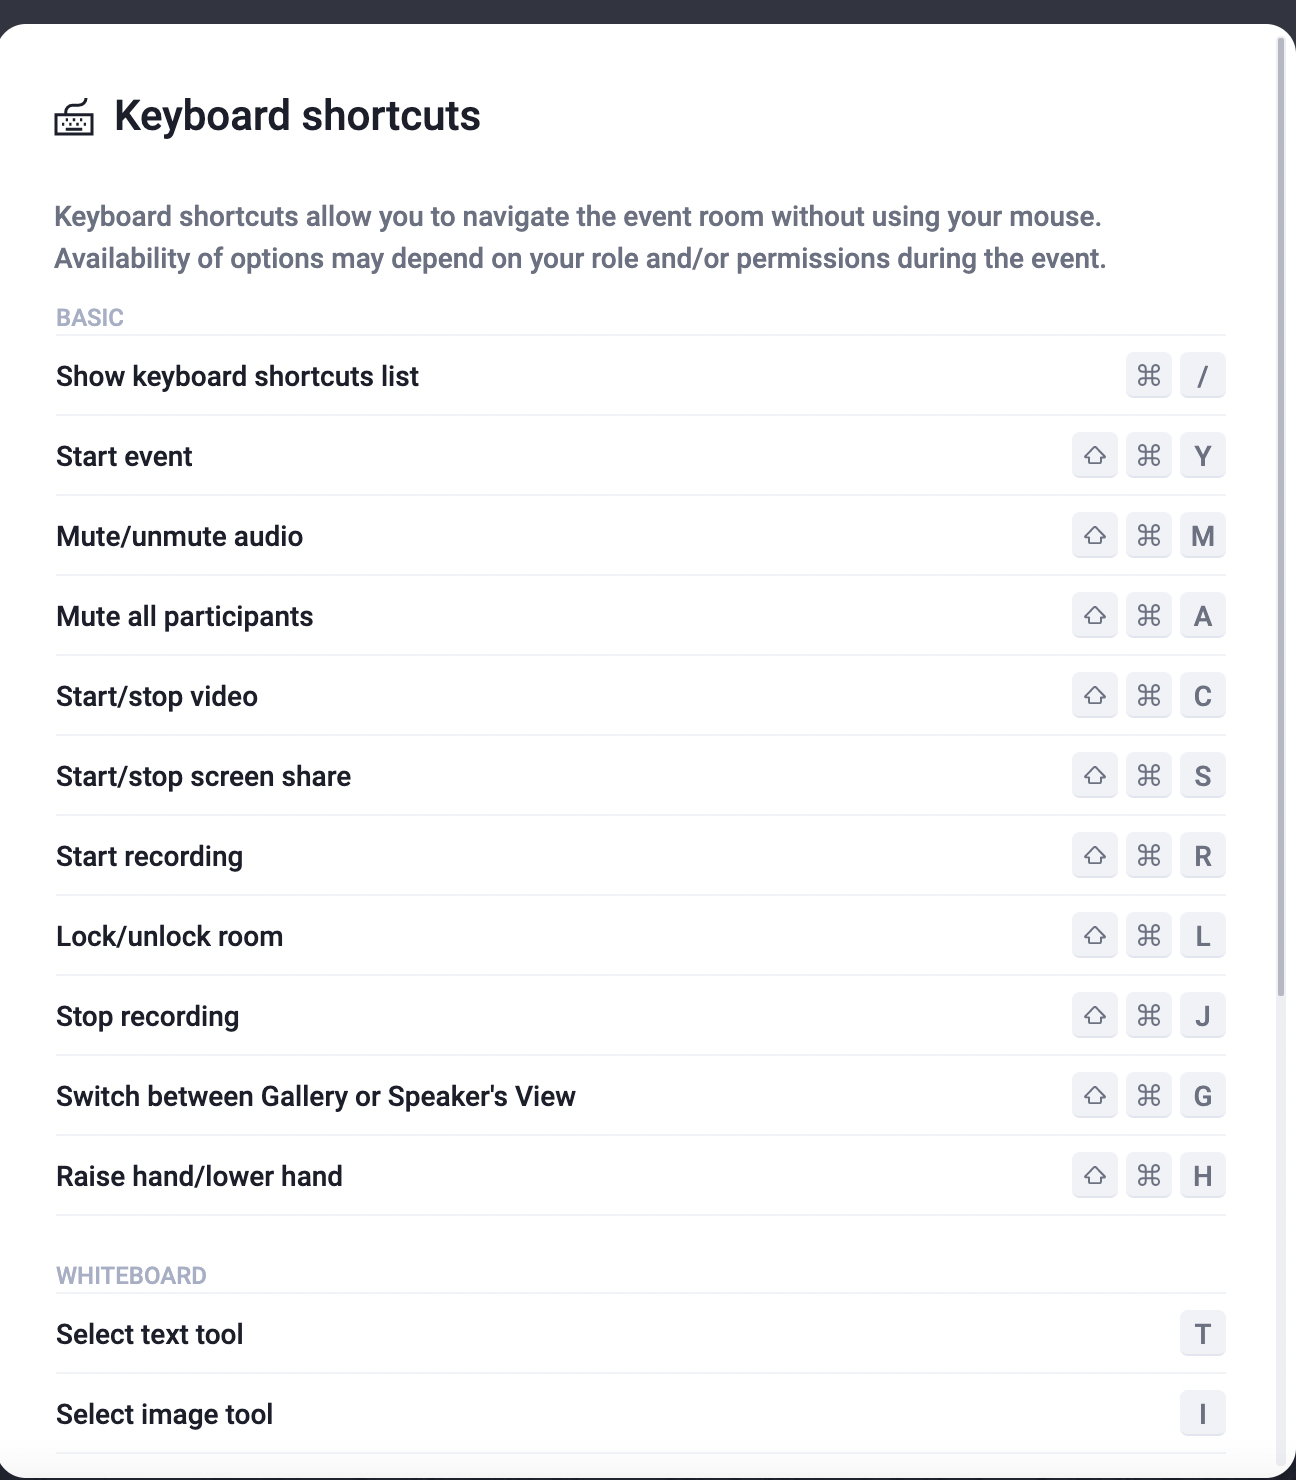
As you can see, the first part of the shortcuts is about the most important activities in the event window, while the second part is about managing the board.
Edu Mode: get a better focus
One of the significant new features we introduced to ClickMeeting last year is Edu Mode.
It’s called Edu Mode but we were thinking about calling It concentration mode because it doesn’t necessarily have to be used in educational sector it can be used for example by the trainers or coaches or people who want to just provide knowledge.
Jan Meissner
During standard classes, the presenter – teacher, university lecturer, coach or trainer – sees all the attendees. The attendees, on the other hand, can see both the teacher and their colleagues. In such a scenario, controlling a group is not always easy, and it also happens that attendees – even without such an intention – get distracted by each other. It is definitely more difficult to create space, e.g. for independent work. In this respect, revolutionary changes are introduced by Edu Mode, which can be activated directly in the event room:
- The presenter sees all attendees,
- An attendee can only see the presenter,
- The presenter can invite a selected person or group to respond, so that this attendee can be heard by others.
Everyone can therefore feel much more relaxed and focus fully on the material presented or the tasks at hand. At the same time, switching between modes is simple, so planning even more effective and interactive classes will be easier.
You will find more info here.
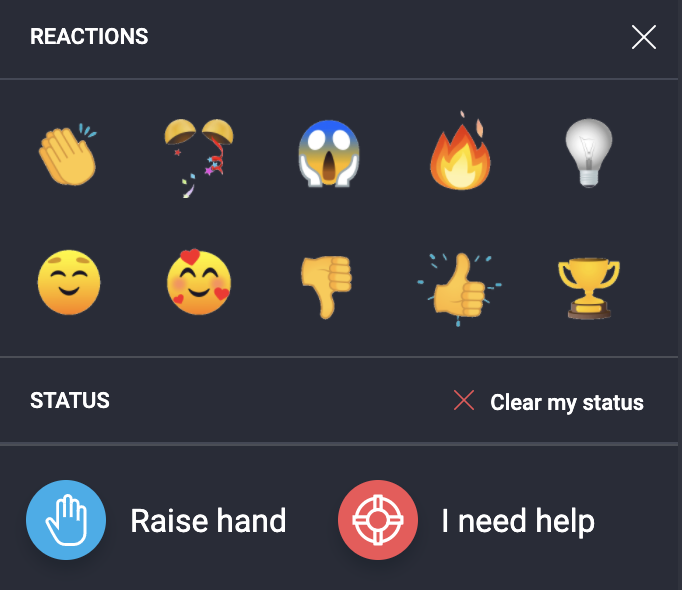
Live Emoji: making communication even more intuitive
Animated emoji are useful in several situations. For example, you can use them to take a quick vote during your event or to react instantly to what is happening.
What are the benefits of live emoji?
- They allow to express diverse information and emotions in a condensed and attractive form,
- They successfully replace more complex (and therefore time-consuming) statements,
- They are visually attractive,
- They give the possibility to react immediately e.g. to the statements of others,
- In online communication they complement verbal communication.
Currently, you can use 10 emoji indicating emotions and two status icons. All of them will be displayed in the AV window. Important: you must have the camera and/or microphone on to use this option.
Uploading files via chat
Sharing files becomes even easier with the ability to upload files directly in the chat window. This way all your attendees will have instant access to the files you previously uploaded to the event room as well as new files you uploaded directly from your hard drive.
How to do it?
Just have to go to the chat section and find the attachment button. Once you click it, you will see all the documents that you have uploaded to your account panel, however you can upload a file from your computer as well.
Jan Meissner
Granting rights to participants
From the perspective of many event hosts, a big problem is granting rights to participants. We often want to allow them to speak or to turn on the camera. In some cases, however, it may become necessary, for example, to mute them.
By clicking on a selected participant you can, for example, grant him the right to turn on the camera or microphone, or grant him presenter status. This will allow them to upload their presentation and use other interactive features. This will work especially well for, for example, conferences where you invite independent experts who can cover a topic.
Jan Meissner
Mirror view
We believe that online meetings are perfectly capable of replacing those that take place face-to-face. Of course, the way you see your interlocutors plays a key role. Currently we have enabled mirroring by default so that you can feel as if you are in a real conversation. You can of course change this option at any time in the AV Window settings.
Managing breakout rooms
Breakout rooms are a tool provided by video conferencing platforms that allows the organizer to divide the participants of an event and distribute them into smaller rooms, where they can work on a specific project or task. Breakout rooms are closed, interactive sessions where all participants can turn on their cameras and microphones, share their screens, and discuss the results of their work.
With breakout rooms, you can divide your events into smaller groups. Imagine you have a company of 100 people gathered at an event and you want to focus on team building. So you can divide it into, let’s say, 10 breakout rooms. You will freely move people to separate rooms. They in turn will be moved from webinar mode to meeting mode. Everyone will be able to turn on their microphone and camera and focus on the tasks you have set before them. When you’re done, with the push of a button, you’ll close all the breakout rooms and return to the main room. The team captains can then present the results of their work.
Jan Meissner
Managing the breakout rooms is extremely simple. When you enter this mode on the left side of the screen you will see a list of your participants and you can drag and drop them into specific breakout rooms. You can also assign them randomly.
When is it a good idea to use a desktop application?
ClickMeeting is extremely easy to use. You only need the latest version of your browser to start. However, we have also developed a desktop application (and mobile application, of course). When is it worth using? First of all, it will be helpful for users who frequently use our tool and organize a large number of online events.
In addition, using the app now is even easier: when you click on a link to an event, you’ll see an invoke each time, allowing you to decide whether you want to switch to the browser version of ClickMeeting or move to the mobile app.
What’s more: it’s a very convenient way to participate in events.
I highly recommend it because I use ClickMeeting a lot and I have to enter many different webinar rooms during the day so memorizing the name of the room, typing your name and password is a lot of work if you do it on a daily basis. With the application when you join the meeting you just copy-paste the url of the webinar room, and with this small star you can add it to your favorites. So that you can go directly to the room. You don’t have to type your name or email, and you don’t have to remember the password and type it. The application will do it for you automatically so it’s just one button and you join the event immediately.
Jan Meissner
Virtual background in the desktop app
Virtual background is an additional feature available in desktop application. It gives you an easy way to place any graphics displayed in the background or apply blur.
Many of my clients and colleagues were asking about the virtual background and yes now you can use it but only in our desktop application. You can’t do it in the browser.
Jan Meissner
How to use and configure the virtual background?
You have to find the settings button under your AV pod. Once you click it you’ll see the list of settings and one of them will be virtual backgrounds. There you can turn it on and off. You can also change your background and once you click this button the application will move you to the following screen so you’ll see yourself with the background that you have selected. Below you will find other photos that are uploaded by ClickMeeting. Of course, you can upload any picture you wish. Instead of a picture you can just blur the real background.
Jan Meissner
Information about a switched-off microphone
I’m sure many of you have started talking in an online meeting and your colleagues have noticed that your microphone is switched off.
No surprise there: using the option to turn off the microphone is extremely useful and worth doing. You can easily control the chaos during a webinar or online meeting.
But sometimes we forget to unmute it. How to avoid stressful situations? We have taken care of it!
We have provided a notification when you are speaking and your microphone is off.
Jan Meissner
In this case, a message will appear on the screen telling you that your microphone is off and suggesting that you turn it on!
 Jan Meissner – Account Manager at ClickMeeting. On a daily basis, takes care of business clients’ inquiries. Privately his passion is exploring foreign cultures and languages. He graduated from the Gdańsk University of Technology with an engineering degree in Control systems and robotics and a master’s degree in Space Technologies and Satellites.