
Your audience doesn’t have time to wander. If they want something—they need it immediately. If they’re searching for information—you must show it without unnecessary steps. If they’re ready to take action—you can’t miss that moment. This is where ClickMeeting’s Call-To-Action (CTA) feature comes into play—unassuming yet incredibly powerful in the hands of any creator, trainer, or entrepreneur running webinars.
Imagine this scenario: You’re hosting a valuable, engaging webinar. You see participants actively asking questions, responding, and taking notes. Right now—at this exact moment—you can offer them something more. With just one click, they can be transported exactly where you want them: to your product store, to a registration landing page for a paid event, or to a newsletter signup form or consultation request. Simple, convenient, and perfectly timed. Sounds good? That’s just the beginning.
In this article, I’ll show you how the revamped CTA feature in ClickMeeting works in practice and the enormous impact it can have on your sales. We’ll walk through the entire creation process, present practical examples, and reveal why you should use this feature especially during free webinars promoting paid training courses. Let’s get started!
Table of Contents
What is a CTA and Why Should You Use It?
CTA, or Call-To-Action, is simply a call to action—in this case, a personalized message with a button that you can display to participants during a webinar. But it’s not just about an aesthetic button that says “Buy Now” or “Sign Up.” It’s a tool that—when used well—can radically increase conversion, boost sales, and maintain audience attention at the most crucial moment of your meeting.
In ClickMeeting, a CTA can take the form of a banner at the top of the screen or a pop-up window in the chat. Both versions allow you to add a title, content, graphics, and—most importantly—a link that takes participants exactly where you want: a sales page, landing page, signup form, online store, payment platform, or other promotional material.
Why is this so important? Because in webinars, as in life, timing is everything. People are most engaged when they’re listening to your presentation, when emotions, curiosity, or need arise. And that’s precisely when you can “catch them” with the right CTA. Without leaving the webinar room, without unnecessary clicks, and without the risk of forgetting where they were supposed to go.
CTA is your tool for immediate action—direct, effective, and perfectly aligned with the rhythm of your presentation.
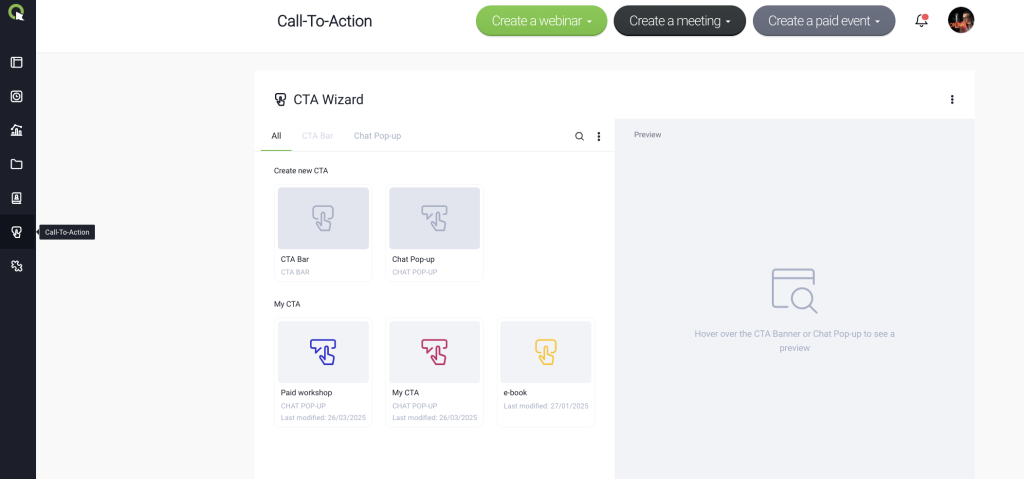
New! CTA also available in the Account Panel
From now on, the Call-to-Action button library and the creator for making new buttons are not only available from the event room. You can also find them in your account panel. The buttons you create and save will be available during all your events.
How to Create a CTA Step by Step
Creating a CTA in ClickMeeting is truly intuitive—you don’t need any technical knowledge or graphic design experience. The entire process takes place in a special creator that you can access directly from your event room. Just a few clicks are all it takes to create a button that transforms your webinar into an effective sales tool.
Step 1: Launch the CTA Function
Log in to your webinar room, go to the menu on the left, and click “Call-To-Action.” This is where you’ll launch the creator that will guide you through the entire configuration process.
Step 2: Choose Your CTA Type
You have two formats to choose from: a banner that appears at the top of the screen, and a Chat Pop-up that appears in the chat window. Creating both follows exactly the same process. As you can see, in this window you can activate one of the buttons created in the past or create a completely new one—just use the “Create new CTA” option.
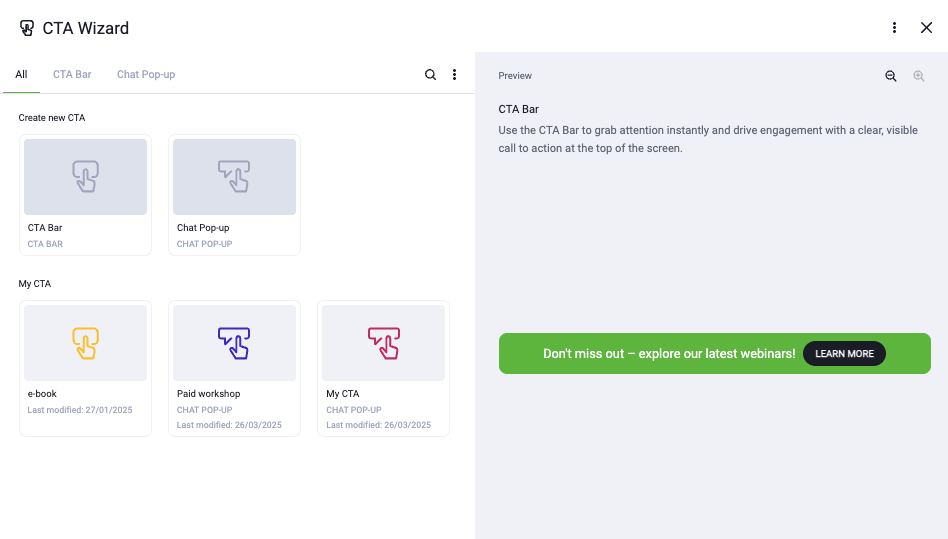
Step 3: Name and Personalize Your Button
Give your CTA a name—it’ll come in handy later if you want to use it again. Then fill in the title (the text that will be displayed above the button), and the button text itself. This is the place for a dynamic call to action—e.g., “Register Now,” “Grab a Discount,” or “Join the Course!”
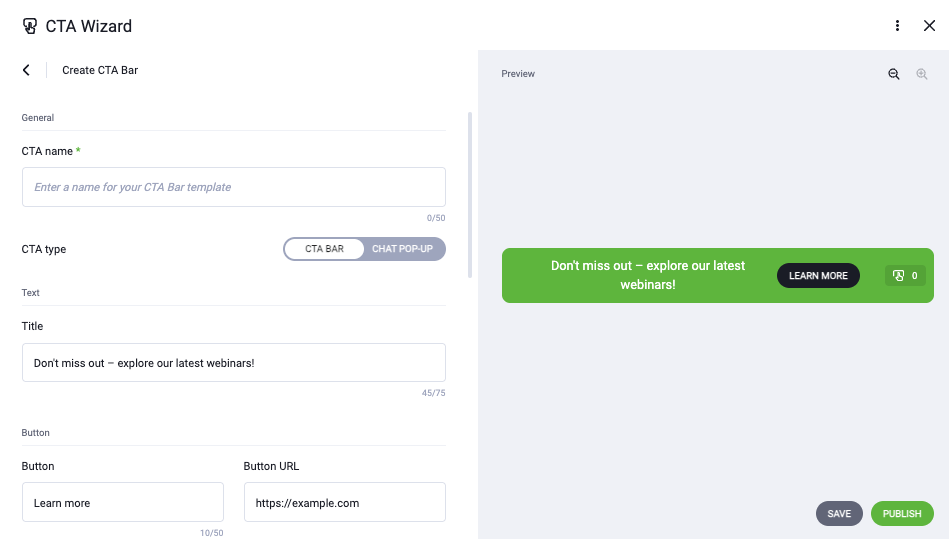
Note that the maximum length of the title is 75 characters, and the button is 50 characters.
In the preview window, you can see how your CTA button looks at all times. Notice that a counter is visible on the right side.
Step 4: Add a Link Where Participants Will Be Redirected
Provide the link where the participant will be taken after clicking. This could be:
- A registration page for a paid webinar
- A landing page with a special offer
- A store with your digital or physical product
- A contact form
Step 5: Increase Your CTA’s Effectiveness with a Click Counter and Automatic Clicks
If you want to further boost your CTA’s effectiveness, reach for features that add dynamics and… slightly raise the temperature in the event room.
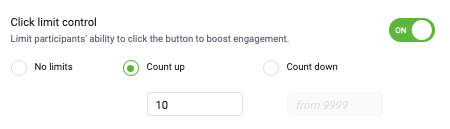
Click limit control allows you to set the maximum number of clicks on the CTA button. You can:
- Set an increasing counter (e.g., from 0 to 10)
- Or a decreasing one (e.g., “only 5 places left!”)
This is a brilliant way to introduce a sense of limited availability—participants will feel that the offer is limited, which can significantly impact their purchase decision.
Automatic clicks is an option that lets you show that “something is happening.” The system will automatically generate a specified number of clicks (e.g., 5) that will appear on the counter within 10 minutes of displaying the CTA. Thanks to this, even at the beginning of the event, before participants have time to react, the counter won’t be empty—this is a powerful psychological trigger that increases trust and creates social proof.
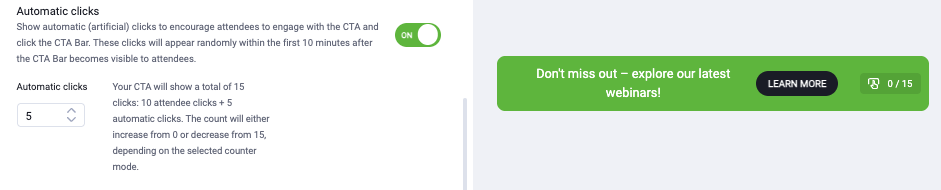
These two tools act as subtle “turbo boosters” for your CTA—they create an atmosphere of interest and increase the chance that participants will not only click but also finalize the purchase.
Step 6: Customize Your CTA’s Appearance to Match Your Brand
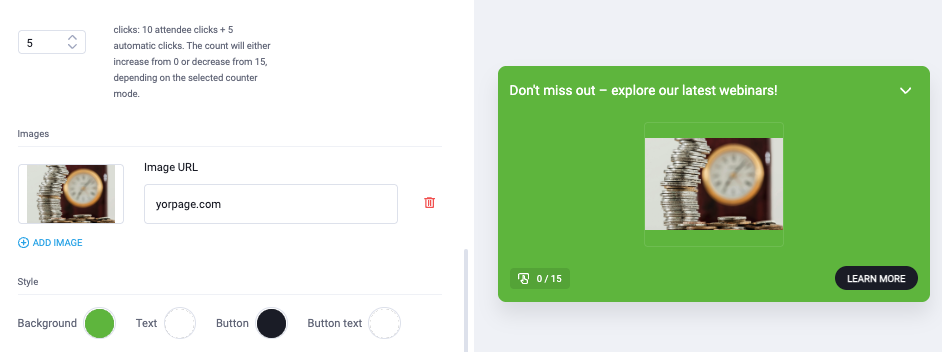
Aesthetics matter—that’s why ClickMeeting allows you to fully personalize your CTA’s appearance. In this section, you can decide how the banner should look and what colors should dominate, to harmoniously fit into your brand’s visual identity.
Choose background, text, and button colors—you can opt for a contrasting set (e.g., green background and white button) that will make the CTA stand out during the webinar, or create a subtle, elegant theme consistent with your branding.
Add an image—this is a great opportunity to better showcase your product or service. You can upload a book thumbnail, a trainer’s photo, graphics with a limited offer, or your company logo.
Link the image—an additional bonus! If a participant clicks not only on the button but also on the graphic, they’ll also be directed to the specified page.
Step 7: Publish Your CTA or Save it as a Template for the Future
Congratulations—your CTA button is ready! Now you can decide what to do next:
If you want to display the CTA immediately during the webinar, simply click “Publish”—the banner or pop-up will appear in your chosen form in the event room.
You can also save the CTA as a template without displaying it right away. This way, the button will go to your personal CTA library, where you’ll find it later in the “My CTAs” tab. This is a great solution if you’re preparing buttons in advance or using the same formats across multiple events.
The saved template will retain all your settings—from graphics to colors and counters—and allow you to instantly activate the CTA in future broadcasts. The result? You save time and ensure that messages are consistent and polished.
Thanks to the CTA library, you can create ready-made button packages for various occasions: event registrations, e-books, contact forms, promotions. Everything ready to use—exactly when you need it.
CTA as a Bridge Between Free and Paid Content—the Heart of Your Money-Making Machine
If you create paid webinars (which we strongly encourage!), you can build a money-making machine. A free event is an important element of the sales funnel—it attracts attention, builds reach, and trust. It allows you to acquire sales leads, but it can also enable direct sales. In this case, CTA is the mechanism that translates traffic into specific business outcomes: registrations, sales, leads. With it, you can guide participants through a logical, well-thought-out process: from “I’m giving you free value” to “see what else I can offer you—in the premium version.” And at precisely the moment when they’re most receptive to your message.
You don’t need to leave the platform, fiddle with additional tools, or switch between windows. Just a few clicks in the CTA creator, and at the right moment of the webinar, participants will see a button that leads them straight to the registration page for paid training, purchasing a consultation, or accessing an online course. It’s like shifting gears in a well-oiled machine—natural, smooth, without energy loss.
What’s more—you can prepare several CTAs and use them strategically: one for initial lead collection, another for upselling, a third as part of a limited offer with a click counter. This way, your machine doesn’t just earn once but becomes a scalable system that works during each subsequent event.
So if you want to monetize your know-how without pushy sales tactics—CTA is your most elegant, yet most effective tool. In this machine, it’s precisely what activates the gears between value and purchase decision.
Try the Refreshed CTA. Completely Free!
With the CTA feature in ClickMeeting, you gain a tool that not only increases your participants’ engagement but also effectively translates their interest into concrete actions—registrations, purchases, or signups for paid events. It’s a simple yet powerful functionality that allows you to create cohesive, automated sales processes, fully integrated with your webinars. From now on, you can easily redirect participants from free content straight to paid offers without interrupting the event.
Don’t wait—try the new CTA now! Take advantage of ClickMeeting’s trial period to see how this feature can increase your webinars’ effectiveness and help you build a profitable online money-making machine. It’s an excellent opportunity to fully discover this feature’s potential and build more engaging, profitable events. Start now and see how simple increasing profits can be!